 Anybody with two boys can tell you; trying to confine them inside on a nice day is like trying to limit Michael Bay to making movies where nothing blows up. It would probably be so much effort that you'd be better off just trying to make sure nobody gets hurt in the process.
When Mama Monkey and I were looking for a new Monkey House a few years ago, one of our top "must have" items was enough space in the backyard to erect a jungle gym... Confession: "play structure" is perhaps a more appropriate term, but then the title of this blog entry wouldn't been nearly as simiantastically satisfying without the jungle reference.
When I was a kid back in the stone ages, nobody had "play structures". We had "swing sets"--flimsy structures of thin-walled steel tubing held together with long-lost screws, rust, and peeling faded paint. The goal, of course was to swing so high that the pipes began to separate and slide out of each other, so that with each rhythmic swing, we were progressively one cycle closer to wonderfully catastrophic collapse.
Play structures today are a still a site for silliness (pay attention to Monkey in the background), but they've become a big deal.
.

They come in a wide range of sizes and prices, from small sensible units like this $400 basic sensible wood gym playset at ToysRUs...

To this $15000 behemoth Adventure Mountain Playset sold by Costco.
Hmm. Don't get me wrong. We love our kids, but I wasn't ready yet to shell out more than a year of college tuition at my Alma mater for them to just burn off some energy and get some fresh air.
Instead, I was looking for something in between, but couldn't find a way to get the perfect combination of price, configuration and build quality.
 That was until I found Detailed Play Systems.
They sell downloadable plans for a fairly intricate play structure that
you make yourself with many options for configuration and expansion
using your choice of lumber and commercially available parts.
That was until I found Detailed Play Systems.
They sell downloadable plans for a fairly intricate play structure that
you make yourself with many options for configuration and expansion
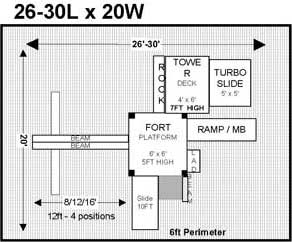
using your choice of lumber and commercially available parts. When we had the hardscape poured in our back- and side-yards, we left a large rectangular area for a future play structure, encircling it with a sidewalk path where the little monkeys could run around, skate, or ride their bikes and tricycles. With a little reconfiguration and modification, the design from Detailed Play Systems would fit perfectly in this area. The plans are painstakingly complete, and after awhile looking through them I felt comfortable tweaking them to suit our needs.

The next step was to sketch out the structure in chalk on the fabric and begin building the frame. High end commercially-available play structures use redwood, while lower end ones use cheaper unspecified varieties the manufacturers optimistically describe as "rot resistant". I chose to take it one step further by using pressure-treated lumber. While pressure-treated wood used to rely on arsenic compounds--making them unsuitable for playground equipment--manufacturers phased them out about ten years ago and now use copper-based compounds. I spent about $1000 in total lumber costs.

The assembly was straightforward, but awkward at points for one monkey to do due to the structure's weight. The DPS plans give precise measurements for every cut and hole, and seem designed for allowing parts for the complete structure to be built off site. Since I could bring my tools to the build location, however, I found it much easier to just cut pieces to fit as needed and drill holes through mating members at the same time, allowing me to account for imperfections and bends in the wood.

For the decking, I found a seller on eBay who was getting rid of a load of old composite lumber (Trex) decking boards he had replaced under warranty. They had varying amounts of surface cracking and peeling, but were still good on the underside and insides. For $30 total--the price of one new board--, I got a full truckload of odds and ends, the majority of which I used as decking for the towers, and cut down and routed the rest as balusters for the railings.
One of the great things about the Internet Age (other than "building a global community", "open access to information" and all of that fluff) is that you can buy anything you want on Amazon. This includes swings, slides, bumpers, and all the other parts real manufacturers use to build the fancy play structures they charge a buttload for. After a ton of searching, I found a deal where Amazon was insane enough to offer a "free shipping" special on a spiral slide. I exercised my credit card and spent about a grand on all the commercial swing parts and accessories to the unit the true pro treatment.

The last step before unleashing the monkeys was to provide some soft cushioning for their little monkey butts. We chose brown recycled rubber bark for its longevity and appearance. This stuff is made from old tires and is not cheap, but it lasts forever so you don't have to "refresh" it every year. We bought three one-ton "super sacks" for $2000, and paid some laborers to convey the bark to the back yard.


