Wednesday, July 31, 2013

Jungle Gym for the Monkeys


Anybody with two boys can tell you; trying to confine them inside on a nice day is like trying to limit Michael Bay to making movies where nothing blows up.  It would probably be so much effort that you'd be better off just trying to make sure nobody gets hurt in the process.

When Mama Monkey and I were looking for a new Monkey House a few years ago,  one of our top "must have" items was enough space in the backyard to erect a jungle gym... Confession: "play structure" is perhaps a more appropriate term, but then the title of this blog entry wouldn't been nearly as simiantastically satisfying without the jungle reference.

When I was a kid back in the stone ages, nobody had "play structures".  We had "swing sets"--flimsy structures of thin-walled steel tubing held together with long-lost screws, rust, and peeling faded paint.  The goal, of course was to swing so high that the pipes began to separate and slide out of each other, so that with each rhythmic swing, we were progressively one cycle closer to wonderfully catastrophic collapse.

Play structures today are a still a site for silliness (pay attention to Monkey in the background), but they've become a big deal.

.


They come in a wide range of sizes and prices, from small sensible units like this $400 basic sensible wood gym playset at ToysRUs...


Kid's Creations Adventure Mountain Playset - Installation Included

To this $15000  behemoth Adventure Mountain Playset sold by Costco.

Hmm.  Don't get me wrong.  We love our kids, but I wasn't ready yet to shell out more than a year of college tuition at my Alma mater for them to just burn off some energy and get some fresh air.

Instead, I was looking for something in between, but couldn't find a way to get the perfect combination of price, configuration and build quality.
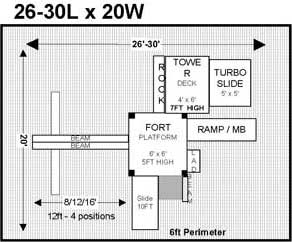

Jungle Fort Tower - Site Plan 2That was until I found Detailed Play Systems.  They sell downloadable plans for a fairly intricate play structure that you make yourself with many options for configuration and expansion using your choice of lumber and commercially available parts.

When we had the hardscape poured in our back- and side-yards, we left a large rectangular area for a future play structure, encircling it with a sidewalk path where the little monkeys could run around, skate, or ride their bikes and tricycles.  With a little reconfiguration and modification, the design from Detailed Play Systems would fit perfectly in this area.  The plans are painstakingly complete, and after awhile looking through them I felt comfortable tweaking them to suit our needs.


The first step was to prepare the ground.  This involved leveling and packing the earth, and then covering it with heavy duty weed cloth.

Big Monkey and I used DeWitt Pro5 commercial landscape fabric that has become my go-to product for this sort of thing.  Much heavier-duty than the stuff you can get at the home center, this material won't (hopefully) disintegrate after only a few years of use.


The next step was to sketch out the structure in chalk on the fabric and begin building the frame.  High end commercially-available play structures use redwood, while lower end ones use cheaper unspecified varieties the manufacturers optimistically describe as "rot resistant".  I chose to take it one step further by using pressure-treated lumber.  While pressure-treated wood used to rely on arsenic compounds--making them unsuitable for playground equipment--manufacturers phased them out about ten years ago and now use copper-based compounds.  I spent about $1000 in total lumber costs.


The assembly was straightforward, but awkward at points for one monkey to do due to the structure's weight.  The DPS plans give precise measurements for every cut and hole, and seem designed for allowing parts for the complete structure to be built off site.  Since I could bring my tools to the build location, however, I found it much easier to just cut pieces to fit as needed and drill holes through mating members at the same time, allowing me to account for imperfections and bends in the wood.


The frame of the main tower and swing came together quickly using the specfied hot-dip-galvanized fasteners.  The special galvanization is necessary because copper preservatives tend to quickly corrode ordinary fasteners--they act as a battery when place in contact with unprotected steel.  The second tower went up a few months later.

For the decking, I found a seller on eBay who was getting rid of a load of old composite lumber (Trex) decking boards he had replaced under warranty.  They had varying amounts of surface cracking and peeling, but were still good on the underside and insides.  For $30 total--the price of one new board--, I got a full truckload of odds and ends, the majority of which I used as decking for the towers, and cut down and routed the rest as balusters for the railings.


One of the great things about the Internet Age (other than "building a global community", "open access to information" and all of that fluff) is that you can buy anything you want on Amazon.  This includes swings, slides, bumpers, and all the other parts real manufacturers use to build the fancy play structures they charge a buttload for.  After a ton of searching, I found a deal where Amazon was insane enough to offer a "free shipping" special on a spiral slide.  I exercised my credit card and spent about a grand on all the commercial swing parts and accessories to the unit the true pro treatment.


The last step before unleashing the monkeys was to provide some soft cushioning for their little monkey butts.  We chose brown recycled rubber bark for its longevity and appearance.  This stuff is made from old tires and is not cheap, but it lasts forever so you don't have to "refresh" it every year.  We bought three one-ton "super sacks" for $2000, and paid some laborers to convey the bark to the back yard.


And here are shots of the completed play structure.  The majority of it was actually completed almost two summers ago, so you can see that the structure and bark are both aging quite well.  We tacked on a few pieces from an older Step 2 tot structure we had to give it a little more variety, and recent additions include the sandbox below and the shade structures above.  Together, they all cement the structure's place as the backyard's center of activity for what we hope will be many summers to come.


Sunday, February 10, 2013

3D Printing, the Frankenlamp, and the World's Awesomest Time Waster


This holiday season, the Cave got a new addition, thanks to the kind generosity of "Santa" (aka Mama Monkey and her folks).   I got a new Solidoodle Pro 3D printer, an invaluable tool and the ultimate plaything for any Maker or Maker wannabe.


While the term "3D printing" conjures up images of red/green glasses and bootleg ViewMaster reels, the real technology is much cooler and occasionally even useful.

I had my first introduction to 3D printing in the Spring of 2004.  It was Wired "NextFest" at Fort Mason, and my friend Debbie and I were fortunate enough to experience a largely splendid showcase of groundbreakingly mundane and trivial technology.  We derisively called it "nyet-fest" at the time.  Nevertheless, nestled in one corner of the exhibition hall, Z Corporation demonstrated something remarkable I had never seen before.  Using inkjet printer components, they had created a device that repeatedly sprayed a fine pattern of water into a bed of plaster, and used it to build up--layer by layer--little plaster statues with remarkable detail.

This demonstration of technology used what Wikipedia refers to as "plaster based 3D modeling" (PP), and one of the first examples of a new class of affordable rapid prototyping tools.  Using it, one could create a small plaster model of practically anything.  If memory serves, Z-Corp's printer still cost around many thousands of dollars a pop, however, and while plaster is fine for making owl statues and Yoda heads, it's not particularly strong or well suited for making functional parts.

The Solidoodle, on the other hand, uses newer "fused deposition modeling" (FDM), which is a essentially a tiny computer controlled glue gun that builds objects layer by layer out of a fine stream of melted plastic.  The technology is emerging and still a little finicky, but has recently become very affordable largely due to the efforts of the RepPap Project.  Unlike plaster, plastic is flexible and durable, and thus well suited for all sorts of functional objects.  Accordingly, I set forth to make useful items and officially designated the Monkey Man Cave as a Yoda head-free zone.


The printer arrived a few weeks ago, and after creating a few custom Lego blocks, replacement missing stool feet, and a new battery cover for a remote control, I was ready for something more sizable and challenging.
The desk in the Man Cave had a nice tiffany type lamp, which my architectural ignorance I will describe as being in the art-deco/arts-and-crafts/mission style.  While I really liked the lamp, I had recently also pruchased a desk-mounted monitor arm, and the lamp was in the way when I wanted to swing the monitor off to the side.  Not content to live with the problem, I came up with a simple solution; Frankenstein the two together, making an unholy monitor arm/lamp union that could combine forces to rule the galaxy while paying homage to the style of the original lamp at the same time.  The 3D printer would be essential.
The monitor arm pivoted on a plain chrome tube that clamped onto the edge of a desk.  To keep the arm from hitting the lamp when it swings around, the idea was to mount the tube permanently on the desk and to wire the tube itself as a new replacement lamp.  To keep with the previous style, however, we'd have to dress up the plain chrome tube.

The existing lamp featured decorative cast metal base topped with beautiful stained glass shade.  I would keep the shade, but the base was too narrow to be re-purposed for the new Frankenlamp.  Instead, I'd have to use the 3D printer to create a new base from scratch.


The first step was easy.  I mounted the monitor stand by unscrewing it from the clamp it came with and fashioned a mounting plate from a large 1/4" thick fender washer.  This I mounted to the desk after drilling a hole for the new lamp wires.

The 3D printer has a maximum print envelope of 6x6x6 inches, so it could not print the lamp base in one piece.  I used OpenSCAD, a parametric code-based design program to create the base with four interlocking pieces that could be printed separately.


Each piece took about three hours to print from a few dollars of black ABS plastic filament.  I used the printer's low-resolution mode, which left the pieces with a subtle horizontal surface texture reminiscent of raw machined metal.


A light coat of spray paint in oil rubbed bronze completed the illusion.


To build up the lamp base, I simply slipped the printed pieces over the chrome monitor support tube. and topped it with a hose clamp that would both hold the parts together and bear the weight of the monitor arm.  A custom top cap piece covered the whole assembly.


I drilled a hole in the top cap to fit a standard lamp assembly from the hardware store, and fastened it to the top with the original lamp shade.


This is the competed Frankenlamp.  Not only does it make a nice addition to the Man Cave, but I was able to add a fabric shade to the original base and reuse it in another part of the house.


Sunday, December 16, 2012

Man Cave Phase III - Painting and Finish


Progress on the Monkey Man-Cave slowed significantly this summer, as other projects, distractions, and... well... life took precedence instead.  Still, moving forward was possible by doing a little here and there on occasional free evenings and weekend afternoons.

The next step was to add some color to the newly textured walls. Big Monkey is always happy to help, especially when painting is involved.  He is a hard worker and, all things considered, did a surprisingly good job, at least on sections of the walls between one and four feet high.

Since the Man Cave would function partially as a shop, I chose a gloss finish latex for easier cleaning.  With experience painting almost all the rooms in a few houses now, I've become a big fan of Behr Premium paint-plus-primer. Its extra thick formulation makes it cover with fewer coats, and it has much less of a tendency to drip, which is important since I'm often too impatient to put drop cloths over everything..

Before the walls could be finished, however, two small projects needed to be completed.  First, to pass through light from the garage door lites behind, I assembled a window from individual glass blocks and caulked them into the opening previously framed in the far wall.

To inflate tires and power pneumatic tools at key locations, I also installed outlets and tubing from a RapidAir Compressed Air System. This product features plastic pressure-rated tubing, push-on fittings, and machined aluminum manifolds that connect together quickly and easily to make a flexible air distribution system that can be routed through walls.
For floors, I chose a TrafficMaster Allure polyvinyl floating floor at Home Depot  Waterproof and durable, vinyl seemed like an ideal product to install over the bare concrete.  The TrafficMaster product comes in simulated wood-like boards and features patented overlapping strips that fasten the planks to each other instead of the subfloor so seams won't open up.  Best of all, they cut with scissors and feature a peel-and-stick install so that the whole room could be done in only a few hours.

As easy as they were to lay down, Little Monkey still wasn't a whole lot of direct help in the process.  He chose to watch and supervise instead.


After hacking down and hanging a reclaimed door from Craigslist, casing the window and doors, adding some light fixtures, and doing some remedial decorating, the Monkey Cave now has a nice space for computer and office work.


The other side of the Cave provides good working space for a workbench with tools and parts for projects.  A rolling cart (not shown) holds table and miter saws that can be moved outside for more substantial construction.


On the last wall, the addition of some storage cabinets and a modest TV (a hand-me-down from the family room) complete the project.  Now, an area that was once just an empty parking space is nicely serviceable Monkey Man-Cave for projects and days working from home. 


Thursday, November 1, 2012

Going Green the Hard Way

Growing up, my Mom always accused me of having a "black" (i.e. not "green") thumb, meaning that properly growing and caring for living plants was not within my natural skill set.  In my defense, I really don't think using scotch tape to hastily repair broken stalks of a knocked down houseplant should count.  Any good legal expert would tell you that emergency trauma situations are entirely different, and that Good Samaritan laws do (or at least should) offer plenty of protection in this case.  The fact that I was the one who had knocked down the plant in the first place, of course, is clearly immaterial.


Nevertheless, earlier this summer, it occurred to us that our neighbors might actually speak to us once in awhile if we did something to improve the curb appeal of our new home.  The previous owner had apparently done quite a bit to counter-endear herself to the rest of the street, and it was clear that an overt gesture on our part would be necessary.  Not bringing down everyone's property values would probably be a good start.

To match with the street's other manicured lawns and shrubbery, our predecessor had carefully decorated her front lawn with an eclectic mixture of neglected straggly turf, random rocks, creepy desert plants, and exposed landscape fabric and dirt.   Lacking sufficient individualism to proudly keep this theme going ourselves, we opted for traditional grass instead.

Okay.  So grass isn't green.  Well, of course it's green but it isn't really GREEN.  It uses a lot of water and doesn't produce anything nice to eat, unless, of course, you're a goat.  And even then, I hear they only munch on it when mindlessly snacking.  Truth be told, we really would like to have artificial turf, but with over 2000 square feet of dirt-laden goodness to cover, that just wasn't in the budget.


Sod would be an easy solution.  For a few grand we could have someone regrade the area, fix and extend the sprinklers, and roll out bundles of fresh grass onto the slope like Baby Monkey's bean and cheese burrito on the dining room table at dinner time.  Still, that would violate the spirit of being a True Maker and -- even more importantly -- violate the spirit of being a True Cheapskate.

The cheap solution would be growing grass from seed.  For a little more time and effort, and about $200 in seed, this seemed like a much more palatable solution.  At the local Sloat garden center, we found boxes of dwarf fescue seed that promised drought tolerant, slow-growth grass that could be cut shorter and required less mowing.  For us, "mow less" is always "mo' better", so it was an easy choice.

The first step was to break up the soil and remove all of the existing vegetation, rocks, and debris.  For this, we got this Earthlink Electric Cultivator from Amazon for $100.  This did the job nicely, and had a surprising amount of power.  It had none of the mess, smell, and danger of gas-powered tillers like the one I used as a kid.  Nevertheless, I highly recommend it..


When we had our pool put in, we instructed the contractor to dump much of the excavated soil out front.  This leveled out the upper part of the yard (which we wanted) but also buried the existing sprinklers up to a foot below the surface.  Consequently, the next step in our saga was to dig out and extend the buried sprinklers and then regrade the soil to a nice smooth slope.  This wasn't terribly complicated, but took a good deal of effort involving laying out string lines and a lot of painstaking digging, shoveling, and raking.  Fortunately, I had day laborers (such as Big Monkey above) available to help and offer moral support.


Some, such as Baby Monkey, worked for popsicles.


We laid out some weed cloth and border edging to make curved planting beds at the base of the hill, then sprinkled grass seed and fertilizer with a rotary spreader.  After that, all we had to do was water and wait.

After a week, voila! sprouts started to appear.  After a few months, it had grown to a perfectly passable and respectable lawn.  It still contains a fair amount of weeds (mainly dandylions and burr clover) that sprouted with the grass, but I'll treat for them soon once the weather is reliably cooler.  Until then, we're lucky that closely cut weeds look an awful lot like closely cut grass.

Monday, July 2, 2012

Monkey Gardening and the Flip-top Camper Shell

Every homeowner, at some time, for some project, needs a truck... And not a polish-it-every-weekend-keep-it-under-a-cover-pretend-that-it's-still-new type of truck, but a real truck meant for getting dirty and accomplishing real work rather than being pretty to impress other people.

Fortunately,  I have a small beater truck that fits that description perfectly, especially the not-impressing-other-people part.  I bought it from a coworker many years ago for 1000 bucks, and I call it my "Home Depot" truck because it only sees service when I have to haul materials for the latest Monkey project.  It has served me well many times over the years, but before the latest project at my family's new digs, it needed a maker-style upgrade.

The latest Monkey House project is a fruit and vegetable garden to grow goodies like fresh melons, strawberries, tomatoes, and of course,... bananas.  For this, we needed to add about 5 cubic yards of soil.  In the past, I've hauled building materials in the truck by temporarily unbolting and removing the camper shell, and then using a tarp to cover the bed when traveling.  This was laborious and time consuming, however, so I've long wanted to use this as an excuse for building a contraption to make the process easier.

My idea was to hinge the camper shell so that it could flip up and forward toward the cab for easy loading.  I've never seen anybody accomplish this, probably because 1) most people are unwilling to defile their vehicle in this way, 2) it's ridiculous, and 3) the camper shell would just hit the cab in any obvious hinge configuration.


I originally designed a four-bar linkage mechanism that would raise and pull back the shell as it was tilted, but discovered in testing that if properly placed, only two simple struts were needed.  These struts would provide a floating pivot point for the top edge of the shell, and the bottom could carry the weight and slide back along the top edges of the bed sides.

The only tricky parts of the build were getting the strut placements right and finding a way to flexibly attach the aluminum struts to the camper shell and bed.  I attached the top front ends with hinges pop riveted to both the struts and shell frame.   For the rear facing ends, however, I need to support rotation from the side of the strut.  To do this, I re-purposed the twist hasp of a gate latch to make the odd pivoting attachment.

With the struts in place, and the addition of a pull handle and some locking clasps to keep the thing secure when driving, the total build was completed in a few hours.  The guys at the landscape supply yard were certainly surprised.  With a loader, they'd already dropped in two bucket-loads (one cubic yard) of soil and I was closed up and on my way before other customers had even made a dent in the loads they were manually shoveling into their truck beds.

Of course, I still had to shovel the soil back out of the truck bed, but at least for that I had Big Monkey to help me.


Little Monkey was somewhat less help, but made up for it with a high cuteness factor.


With Mama Monkey handling all the actual green thumbing, all I needed to do was add some irrigation...


and some border fencing (using landscaping poles, pressure-treated lumber, and galvanized post mounting brackets)...


and plastic garden lattice nailed with galvanized nails into the fencing (using my new cordless nail gun mentioned in a previous post)


And that's it.  The garden wraps around a large area reserved for the play structure I'm putting the finishing touches on.  Note the humble tree in the corner.  I can't wait to taste the bananas!